

Monday, December 30, 2013
Sunday, December 22, 2013

Tuesday, December 17, 2013
Sleep on it

Time for the edging. I did MANY different edges on this pendant.
I had 2mm crystals involved - no didn't like it.
I had 3mm crystals involved - no didn't like it.
I made it larger and had more twin beads - no didn't like it.
I used the silver 15s near the red twins - no didn't want silver near the red.
I used size 15s and 11s - some warping happened.
I eventually worked out the warping and played with colours to come up with the one you see above. It was okay and thought I would sleep on it and see how I felt in the morning.

I woke this morning and was quite okay with how it looked, took pics and posted it on Facebook.
I sat to make another one so I could get the steps into my mind and under two hours it was completed and I had an edging I love - the one on the right.
Much happier with the difference.
It pays to sleep on it sometimes.
Saturday, December 7, 2013
Christmas 2013 in my home - for my sister in Perth

For the last four years I have spent Christmas at home alone as I have been completely over Christmas by the time it has come around. i am glad I did that, however last Christmas I did not enjoy being alone and vowed I would spend it with friends again in 2013.
Well I am thoroughly enjoying it being Christmas this year. I guess having those alone times has re-invigorated me to get all inspired and have friends around again. I have old time 'jukebox' music on, bopping around the house, decorating, singing and Facebooking, all at the same time and now blogging as well…..LOL
 I have been decorating the house for an early Christmas Sunday lunch, tomorrow, and I thought I would like my sister Sue, in Perth (the west coast of Australia) see what I have been doing so she feels a bit more involved. I miss her.
Above is a wreath I decorated for the front door. Each year I make it a bit different. On your right is a Christmas tree I made and each year decorate it a little bit different also.
Below are flowers I have on the mantle for tomorrow's lunch. You can see a self portrait - when I was 41 - on the wall and another in the mirror - what I look like now LOL.


On the bottom right is another tree with all my beaded stars on it. I thought I could have this on display tomorrow also.
So sister Sue, here are some pictures for you darlin' so you can see how my home looks during Christmas. Loads of love to you and your family, Merry Christmas.
Tuesday, December 3, 2013
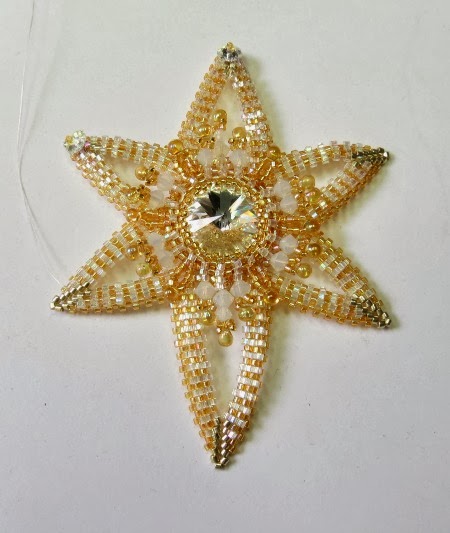
Sun Star

This morning I started out making one thing and after half an hour I pulled it apart and started another star. Obviously I am not finished with these Christmas stars as yet.
It started out being a bit of a problem and eventually I was able to get it to work. I enjoyed making this one very much and feel it is my best star so far.
The points are different. each second point is concave and then alternates are convex, so it has a sculptured look and catches the light more. The reverse side is similar, just slightly different and also beautiful.
I wonder if I am finished with stars now???
Saturday, November 30, 2013
A new Star and new Tutorial - Anahata Star


I have been experimenting with Christmas decorations again and this is my fifth design and my second tutorial "Anahata Star" One star with two different sides.
Symbolism of the "Anahata Star":
Heart Chakra - Anahata - related to the thymus, located in the chest. The Thymus is an element if the immune system as well as being part of the endocrine system. It is the site of maturation of the T cells responsible for fending off disease and may be adversely affected by stress. Anahata is symbolised by a lotus flower with twelve petals. (See also Heart/Mind) Anahata is related to the colours green and pink. Key issues involving Anahata involve complex emotions, compassion, tenderness, unconditional love, equilibrium, rejection and well-being. Physically Anahata governs circulation, emotionally it governs unconditional love for the self and others, mentally it governs passion, and spiritually it governs devotion.
Perfect for this special time of year, attributes definitely required for Christmas celebrations.
Just click on the image and it will take you to my store or click on the purple avatar on my side panel.
Wednesday, November 27, 2013
More Christmas Stars


I have been playing some more making different stars in time for the Christmas Season.
To the right is my "Stellar Australis" star and the first version of my "Anahata Star".
On the left is one star different on each side. I am currently writing the tutorial for this one after being requested to do so.
I think I could spend a lot of time making Christmas designs as they are great fun to make.
Monday, November 25, 2013
Stellar Australis - the seven point star

I have just finished writing a tutorial for a Christmas decoration I am calling "Stellar Australis" - a seven pointed star - after the star on the Australian flag.
 My previous six point star attracted so much attention on Facebook I felt I wanted to simplify the design and write a tutorial so those who purchased it would have time to get in what they need and still have time to make it for their Christmas Tree.
If you are interested in a tutorial just click on the image and it will take you to my Artfire store.
Religious/occult symbolism of the seven point star:
The heptagram was used in Christianity to symbolize the seven days of creation and became a traditional symbol for warding off evil.The heptagram is also the symbol of perfection (or God) in many Christian religions.
The heptagram is known among neo-Pagans as the Elven Star or Fairy Star. It is treated as a sacred symbol in various modern Pagan and witchcraft traditions. Similarly, it has been adopted as an identifier by some members of the Otherkin subculture. Blue Star Wicca also uses the symbol, where it is referred to as a septegram. The second heptagram is also a symbol of magical power in some Pagan religions.
In alchemy, a seven-sided star can refer to the seven planets which were known to ancient alchemists.
Wednesday, November 13, 2013
My first Christmas Ornament.
A few mornings ago I thought I would have a try at making a Christmas ornament. I was in need of making something different for a change.

I have learnt a few things from doing the rick-rack designs and wanted to put the learning into this star.
I worked on the 'front' side of my star - image to your left - and was very happy with how it looked but overall I was disappointed. I felt the back had to look nice also and the very tips of the points didn't bling enough so I put it aside, not certain I would finish it or pull it apart.
I left it alone yesterday morning as I just wasn't into playing with it anymore. I spent the morning tutorial writing instead. This morning I woke and thought I would continue tutorial writing, got my computer ready, made my coffee and as I sat down I looked at the unfinished star.
I immediately wanted to play with it again, with an idea of what to do for the 'back' side. Needless to say what I intended to do and what I did do were completely different.
 I covered the rivoli back with size 15/o seed beads only to decide I preferred it uncovered. I went ahead and surrounded the bezel back in 2mm crystals and made a smaller 'star' like shape emanating out from the crystal ring. As I placed the teardrop crystal on each star point I was also enhancing the 'front' as this teardrop could be seen both sides.
To give the 'front' star points more bling I added a Swarovski marguerite flower crystal to each point. That sure took care of the sparkle.
 To your right is the 'back' of my star with a pale centre and the teardrop points. To the left is the 'front' of my star with a gold and white centre and the teardrops on the back can be seen here also.
Overall I am very happy with the results and glad I didn't pull it apart. Sometimes we need to leave things alone for awhile before we can move forward again. This is a perfect case of the benefit of being more patient and waiting to be re-inspired.
I am a little late for writing a tutorial for this in time for people to make for Christmas but it shall be written and ready for Christmas in July and definitely for Christmas 2014.
Sunday, November 10, 2013
My Second Rick Rack design.


Here is my second venture into a Rick Rack design from Contemporary Geometric Beadwork.
I had a specific idea when I started out on this piece, but along the way the ideas for variation flowed so readily. I had to turn that "voice" off in my head and go with feelings in the end.
Too many options was becoming too confusing. These are a lot of fun to make and I can see I will continue to explore with them but not before I order more delicas.
It was running out of two colours that determined where I finished. I am happy with the results though.
Thursday, November 7, 2013
Contemporary Geometric Beadwork

There is a book called Contemporary Geometric Beadwork put out by Kate McKinnon.
The book ISBN 978-0-9816468-0-0
I have had this book for awhile and found it has amazing images of a huge variety of designs. Every time I thought to have a go at making one I would put the book down not knowing where to start or which one to try.
Finally I persevered and here is my finished item I call - "Whimsy".
I started with a Modified Right Angle Weave - MRAW Page 157 - as it allows you to increase/decrease to get your shaping straight away. I then did a few rows of my patterning and removed the MRAW and it comes off so easily. Some people include the MRAW to achieve a double layer edging. I did mine with a double layer peyote edging.
I found making this very addictive and was always wanting to see how the patterns would look so it became very hard to put down. After doing quite a bit I was disappointed I had started with 7 peaks in the design so I then decided to see if I could make more peaks, feeling I had nothing to lose.
Well that was a great move as I ended up doubling the peaks to 14 and little "windows" to embellish became evident.
All the time I was making it I kept my mind on 'play', just play with the colours, play with the patterns, keep it fun and not get precious about it.
I think that was the right decision to make.
When I finished, I sent a picture of my design to Kate McKinnon who has since 'interviewed' me on it, asked for more images and has promised my "Whimsy" will be in her next book
Contemporary Geometric Beadwork Volume II
Should you wish to see more of Kate's amazing pieces here is a link to her website.
http://katemckinnon.bigcartel.com
Sunday, November 3, 2013
Featured in Marcia DeCoster's new book

Quite some time ago Marcia DeCoster asked if I would like to participate in a new book she was planning called "Marcia DeCoster Presents", featuring 30 bead artists and their work. Naturally I jumped at the chance.
Being able to share my ideas and creative process along with all these other artists is a great opportunity.
Today they released the cover image for the book and now I am finding out who the other artists are being featured. Some of them I already have a Facebook friendship with and I am thrilled to be grouped with such talented artists.
I met Marcia at a workshop she taught in 2010. I was very keen to talk with an international beading artist and learn what goes on 'out there' in the big beading world. Marcia was very gracious and more than willing to
share her learnings, and has been very supportive of me ever since. I have huge gratitude when I think
of how supportive Marcia has been.
Many thanks to you Marcia.
share her learnings, and has been very supportive of me ever since. I have huge gratitude when I think
of how supportive Marcia has been.
Many thanks to you Marcia.
The picture above is a link to pre-order Marcia's book if you are wanting one. Just click on the book image and it will take you there.
It is all very exciting and I am looking forward to seeing my work in print. I will show some images of pieces I have in the book soon, as I've not shown them before.
Thursday, October 31, 2013
Lady Madeleine's Necklace - Finished

Here is the finished necklace I started on Sunday when doing a workshop with Helena Tang Lim.
It is a beautiful and very elegant design and I learnt things I can use in my own work in time.
Always good being a student sometimes, as you do learn new ideas.
If anyone is wanting more information on Helena, below is a link to her
shop.
http://www.manek-manek.com
Helena is currently in Australia and will not be back in Singapore until November 25th,
Helena is currently in Australia and will not be back in Singapore until November 25th,
Monday, October 28, 2013
A class with Helena Tang Lim

For the last few years I have done a workshop with international designers when they visit to teach at The Melbourne Bead Expo, run by The Bead Society of Victoria.
I have met Marcia DeCoster, Melanie Potter and this year I met Helena Tang Lim.
Helena has been a beader for 20 years, coming from a background making traditional Chinese beaded shoes, which today sell for $1000.00 each. An amazing designer whose designs, colour palette, layout and originality I really admire. Also a big lover of Swarovski montees I learnt the difference between a 'Rose' montee and a 'chaton' montee yesterday. One is never too old to learn.

 Yesterday's class was small in numbers and I had met 4 of the 5 ladies before. Helena shared information in a very relaxed manner, making the class seem effortless.
I was very fortunate to see Helena's Battle of the Beadsmith 2012 piece - the one with the beetle wings - along with another she had done and changed her mind about.
Very unique creations with a charming mix of embroidery and bead-weaving. I enjoyed being surprised seeing where she placed her clasps, most original.
Below is the Lady Madeleine's necklace centrepiece I learnt to make in class. I finished the bale part this morning. Now I need to make the rope and attach it.

If you ever get the chance to meet and learn from Helena do not hesitate.
It is a great experience I am very glad to have had.
Saturday, October 26, 2013
Introducing "Sunny" - A Fluoro flower Pendant and Rope
I made this awhile ago and recently proposed a new class format to the college I teach at. I suggested we try a two evening class for teaching "Sunny" and they accepted the idea.
We weren't sure if the class was going ahead until 3 days beforehand so I was in a frenzy to write the
tutorial and get everything done in time. Luckily I managed to get most of the centrepiece tutorial finished in time to teach and the rest was ready for the second evening's class.
I must say I was very pleased to see the end result of the class and I believe the students were also happy with everything.
I shall be attempting more of this kind of teaching in future.

Click on the picture to visit my tutorial shop.
Friday, October 18, 2013
The Perfect Connection - working with FireLine
Hello and thank you for visiting.
I want to share some of the "tricks" I use when working with FireLine. I have already shared this on the Bead Mavens blog and thought I would show it here also for anyone not going to the Mavens.
I want to share some of the "tricks" I use when working with FireLine. I have already shared this on the Bead Mavens blog and thought I would show it here also for anyone not going to the Mavens.
I started beadweaving in 2007 and was taught to use Nymo. I became pretty proficient with Nymo but was not happy with how it shredded, how hard it sometimes could be to thread the needle and I didn't like how you always had so many threads to sew down when you had finished your creation. Then I purchased Diane Fitzgerald's book Shaped Beadwork and she talked about using a thread called FireLine.
Berkley FireLine is a nylon thread used for fishing, can be purchased in 1lb, 2lb, 4lb, 6lb, 8lb strengths which are ideal for bead weaving and even higher strengths which can be used for bead stringing. FireLine fishing line comes in Crystal (white), Smoke (grey/black), Fluoro Lime Green, Fluoro Pink and now Berkley is releasing reels in limited colours aimed at beaders. I am primarily a beadweaver so I will talk about the main threads I use - 4lb and 6lb weights.
Diane Fitzgerald taught - on pages 14-15 of her book - how to not have a tail in your beadwork, securing a knot by melting the ends of the thread with a cigarette lighter. I used this technique one day, started weaving and almost finished a round when I realised I had the wrong count. Frustrated with the mistake I tried to pull the ring of beads apart. It would not come apart and I came close to cutting my hands.
That was when I realised a way of joining two pieces of Fireline together and I have been doing it ever since.
HOW TO JOIN YOUR FIRELINE
Things to remember:
1) when melting, take the FireLine end towards the base of the flame, NOT the top
2) do not make the 'blobs' of melted FireLine too large.
3) do not allow the FireLine to catch alight as it becomes brittle and breaks easily
4) the reef knot does not need to be tight, just loosely pulled together.
If you are having trouble viewing the video, below is a You Tube link to try
http://www.youtube.com/watch?v=JdHD23yzB-I
When I teach this to my students often they are unable to pull the blobs together fearing breaking the thread. Give it a good tug and it should slide together. If it still won't slide then the reef knot you tied is possibly not allowing it to happen and you may need to try again.
A 'blob' join in 4lb FireLine will travel through size 15s - yes size 15s!!
HOW THE JOIN TRAVELS THOUGH SIZE 15/0 SEEDS
HOW THE JOIN TRAVELS THOUGH SIZE 15/0 SEEDS
NOTE: if I already have a lot of thread passes I do not use a 'blob' join as you may break beads pulling the join through. Be discerning when to use this type of join and when NOT to use it.
I have also used a 'blob' join with 6lb FireLine and size 15/0s but I don't like to push my luck as you may have success for nine beads and then the tenth bead may break - very annoying. A 6lb Fireline 'blob' join is fine for size 11/0s and larger seed beads.
Which brings me to my next "trick" - JOINING IN MORE FIRELINE.
If the area won't take a 'blob' join I melt a blob on a new thread, thread my needle with the other end. I choose an out-of-sight area, sew through a few beads, pull the thread through until the blob catches - do not tug it through - I sew a half hitch knot, pass through a few more beads, sew another half hitch knot and continue to exit where my old work thread is. I then tie the new and old threads with a reef knot and sew down my old work thread. The blob will not pass through the half hitch knots and you have a secure join.
I get pretty frustrated with 'tails' when I start beading, without fail I seem to get the tail tangled in my work. Whenever I can I make a join that does away with tails.
HOW TO AVOID HAVING TAILS
FINISHING AND SEWING DOWN. As we know some ending threads manage to unravel after a period of being worn and handled. When sewing down FireLine I do the usual few half hitch knots, when I cut my thread I cut leaving about 3-4mm showing (1/8") I then use my lighter to quickly melt that small amount into a blob which disappears into your work. This melting hinders the thread from unravelling. NOTE: I do not use this ending near galvanised beads as I have had some change colour. Again be discerning when to use this method and when not to use it.
Every beader I have taught these methods to has never looked back and I am always thanked for sharing this information. Give it a go on a practice piece and see for yourself how it really does work.
You have nothing to loose and everything to gain.
Happy Beading
Patrick
All videos were taken by my dear friend Neva Brown of Nifty Creations, also a talented bead artist.
http://www.niftycreations.com.au
Monday, October 14, 2013
When you are discouraged
I have a friend who tries very hard to make and sell her jewellery. Currently she is very discouraged and asked me what I did whenever I felt discouraged. This is what I wrote to her.
I know what it is like to feel very discouraged. We take so much time and passion to make our designs and they seem wonderful to us and people say they are nice but no one buys them. I found that really hard to comprehend when I started being creative years ago. They rave about your work, yet do nothing about it.
I have almost given up beading a few times in the 6 years I have been weaving. One time I didn't touch beads for 4 months because I was so disgusted with it. Then I realised that I was missing doing something that I really loved doing. I also realised that every time I focused on making money I began to resent making jewellery and became very unhappy and disheartened again. I learnt this lesson a few times.
I decided that I was going to just enjoy designing and making jewellery and not focus on the money side. I was fortunate enough not to have to worry about the money. I thought I don't care what my friends say I am going to be happy and just make stuff and when I die my family will find a house full of jewellery.
It was then I became happy and continued playing and enjoying myself. Funny thing though I made sales every so often, I have not spent my own money for a few years now. Jewellery pays for itself, I have heaps of stock to use and some money in the bank, not a lot but I can buy whatever beads I want. So what I am saying to you my friend is just enjoy the love of being creative, don't focus on the money as it will kill your creativity.
I am not a religious man but I do believe in Divine Design and a Higher Power. I also believe when you channel a vibration of passion the Universe or God or serendipity - whatever you want to call it - supports passion and synchronicity happens. Also when people witness passion they want to have some of it and that often translates into a sale or a recommendation or help.
So, my friend, enjoy what you love to do and leave the consequences to the Higher Power, you may be amazed at what happens.
Friday, October 11, 2013
Tapestry of Crystals


Today I released a new tutorial in my Tapestry Series. This makes number 7
and possibly the last as it is time to move on.
I call this latest release
"Tapestry of Crystals"
Click on the large image above to go to my tutorial shop.
Click on the large image above to go to my tutorial shop.
Rich bands of dark navy, purple and old gold Preciosa Ornela twin beads with AB green seed beads - flashing pink and gold - joined using Swarovski cyclamen opal bicones.
This sure is a sparkler that will bring attention, interest and many a compliment.
Copy and paste the link below if you wish to see more details.
http://www.artfire.com/ext/shop/product_view/7803340
Friday, October 4, 2013
Introducing "Pharaoh"

Here is my latest necklace design, with its resemblence to Egyptian neck collars of old and its very masculine square lines has prompted me to name it "Pharaoh".
Ancient Egyptian jewellery was beautiful, ornate and sometimes overdone in the times of the Pharaohs and jewellery served copious purposes. At times, merely vainglorious ornamentation more often than not, however, jewellery, baubles and trinkets were worn to either symbolise the wearer's prestige and eminence, or to act as religious protection against evil spirits and the fickleness of luck.
The Pharaohs were notorious for showing their wealth, all wore beautiful jewellery and lots of it.
I had fun in coming up with a way to introduce the necklace and wanted my picture to look
like a postcard from Egypt. I think I succeeded - some local travel agents are without a few travel catalogues. Below is another example of how I presented my new design for those who prefer.
Maybe this piece is something to wear whilst floating down the Nile?. What a luscious thought.
A tutorial for the necklace, a pendant and for earrings will follow from this design.

Sunday, September 15, 2013
You never know where inspiration can come from sometimes.

Here we have a necklace I designed
which became the inspiration for my first three tutorials "Tapestry", "Tess" and "Sherrab"
If you look at my post "Bezelling Gemstones" dated July 26th you will see
the centrepiece above is the bezelled gemstone in that post.
If you look at the strap being used to hang this necklace, that became the bands
used in my tutorials "Tapestry" my post dated August 20th and "Tess" which came later.
If you look at the smaller components in this necklace they were the inspiration
for the pendants I called "Sherrab" my post dated August 30th.
Always be alert to the possibilities available when designing, you just may have a lot
more than you originally thought.
Wednesday, September 11, 2013
"Isla Rosa" - pendant tutorial

For those who may be interested here is the link to my Artfire Tutorial store
for the"Isla Rosa" tutorial.
Just click on the image.
Just click on the image.
Saturday, September 7, 2013
Works in Progress

When I am designing a new piece, sometimes getting it to a place satisfactory to me requires quite a number of attempts. Now I have begun writing tutorials my designs are starting to alter because I am thinking "can I do a tutorial for this?"
Here you have four attempts at making a design and coming up with one that is easy to write
and still looks good.
On the right here you have a purple Lunasoft Cabochon surrounded in my latest design idea using super-duo beads in a shape that resembles 'flowers'.
I added crystals in this piece and although it is really pretty there are far too many steps to be illustrating for a tutorial. This pattern needs to be simplified.
 The next image, on the right, shows my second attempt. The crystals have been removed, there are less steps in making this one and it is a design still very pleasing to the eye.
I showed this on Facebook and I had a competition for ladies to name the item and one woman suggested "Isla Rosa" It reminded her of seeing little islands - "Isla" - from a high perspective and the Rosa because the 'flowers' had an old fashioned rose look about them. So "Isla Rosa" it is and a tutorial to be written.
BUT, once again, too difficult to illustrate and for a beginner student to comprehend in a tutorial.

The next image, on the left, has the second and the third piece I designed side by side. Now, with the third design, I had a result that was easy to make, easy to write in a tutorial, easy for a beginner to understand and still attractive.
I have a winner I thought - not quite!
Since showing the second piece on Facebook and having it named, when I showed the third piece on Facebook a lot of women preferred the second design saying it had a charm about it and they commented saying the third design was like a lot of other things they had seen before. A good point
So the results of all this you ask?
It has taken 3 attempts at coming up with a creation that I am able to write into a tutorial, one that will be easy to create, easy to understand, and easy for a beginner to comprehend. A creation that will have the combination of the charm of the second piece, the easy steps of the third piece and still have its very own individuality, not resembling a lot of other items 'out there'.
But then isn't that the designing process? You keep at it until you are satisfied you have what you want.

This next image you may wonder?
This image, on the right, is me playing with colour placement and having a bit of fun. I like this being called "Chilli Peppers" it has an ethnic/spanish/mexican look about it.
So could you now say 4 attempts and 2 designs ?
Friday, August 30, 2013
"Sherrab" - my pendant tutorial

I am pleased to share my next tutorial with you for a pendant I call "Sherrab"
I have a bead store quite close to my home owned by Chinese people and they have a large range of Chinese crystal beads in all sorts of shapes and sizes and colours and very affordable.
Each time I walk into the store they grab my attention.
I know a lot of people don't value Chinese crystals all that much but in the 7 years I have been beading their quality is getting better and better. They are more consistent in sizing, the holes are great for bead weaving - albeit a bit sharp but multiple thread passes fix that problem - just like Swarovski crystals.
I particularly love the opaque coloured rhondelles they have and recently designed a necklace component using the green rhondelles you see above. I showed the component to friends who loved it, which then prompted me to make a pendant and write a tutorial.
My "Sherrab" tutorial has 20 full colour graphic illustrations explaining each step for the Red pendant and has three variations included - all the images above can be made from the one tutorial.
Some knowledge of peyote stitch is required so it is very suitable for a Beginner.
Should you be interested just copy and paste my Artfire connection below to check it out.
I hope you like my designs.
http://www.artfire.com/ext/shop/studio/patrickduggandesigns


Tuesday, August 20, 2013
My first Tutorial


May I present to you my first tutorial "Tapestry" a pattern for a necklace, bracelet and earrings also one that is quick and easy to make. If you are interested the link click on the image above and it will take you to my Artfire Tutorial shop.
Sorry I only have one pattern there so far, but it is a start and I have a stack of designs rolling in my head waiting to be written. Here is the story on how this came about.
I have been learning to write tutorials for close on 12 months. Jewellery making is fun to me and I have not enjoyed writing as it takes a very long time and seems too much like 'work'.
A few times I have made attempts to write my patterns, only to get to a point where I don't know
how to illustrate the next step and I begin to feel very bogged down.
how to illustrate the next step and I begin to feel very bogged down.
Until just recently I had pretty much decided not to write tutorials, even though I was being asked for them regularly on Facebook.
Last week I was making a new necklace design and thought to myself " this needs to be further developed and I have the ability to illustrate this pattern". Well that was a change for me !!
.
Tuesday, August 6, 2013
Bead Mavens

I am happy to announce this morning I am one of the Bead Mavens. What is a Maven you may ask? The dictionary defines it as
ma-ven also ma-vin n.
A person who has special knowledge or experience; an expert.
Well I was surprised to read that and I certainly don't think of myself as an expert in anything.
So let me tell you about the Bead Mavens.
A colleague, Mikki Ferrugiaro, is the founder of the blog dedicated to helping other novice beaders - both the artists (Mavens) and the followers
http://beadmavens.blogspot.com.au/
http://beadmavens.blogspot.com.au/
.
Mikki has chosen six artists as Mavens. The Mavens are relatively new in terms of releasing their designs and writing tutorials. Each Maven is to write about their experiences in beading, sharing tips, talking about colour, use of materials, whatever we wish.
Each Maven is also required to write two free tutorials per year. This way the followers of
Bead Mavens blog get to have free tutorials and the Mavens get to receive feedback on their tutorial writing skills. It is a Win/Win situation.
Bead Mavens blog get to have free tutorials and the Mavens get to receive feedback on their tutorial writing skills. It is a Win/Win situation.
Some of today's well known designers began as a Maven years ago and due to a loss of a founder and commitments in other areas the Bead Maven blog has been closed for awhile.
Yesterday all that changed with Valorie Clifton being introduced as a Maven and this morning I was introduced as a Maven - click on the link below or the yellow box over on the side bar
http://beadmavens.blogspot.com.au/2013/08/introducingpatrick-duggan.html
There are four more artists being revealed over the next week and it is very exciting
to be linked with such a great group. So for all you aspiring beaders 'out there' I recommend you check Bead Mavens and join the blog as a follower.
to be linked with such a great group. So for all you aspiring beaders 'out there' I recommend you check Bead Mavens and join the blog as a follower.
You too can be in a Win/Win situation
Saturday, July 27, 2013
The Making of "Whirl"

On your left is a picture of my design "Whirl"
currently in the gallery section of
Marcia DeCoster's newly released book "Beads in Motion."
There are some really fun, interesting and beautiful things to create and because they move "play" with.
There are some really fun, interesting and beautiful things to create and because they move "play" with.
The theme behind Marcia's book is some part of the jewellery has to have an element of movement i.e.
spin, sway, swing or slide.
Below is the story of how this came about.


Back in March 2012, I was experimenting and created this little pendant that gave an impression of movement as it looked like it spins.
I called the pendant "Whirl" and posted a picture on Facebook.
Marcia commented on my post asking me - Does it spin?
I was then invited by Marcia to submit a design/s for her upcoming book "Beads in Motion"

Taking what I had learnt from my first creation I made another and improved the overall look and set it on a herringbone rope.
Facebook pictures were posted and again Marcia asked
Does it spin?
My reply then was "No, but I am working on it"
 Here is me "working" on the design.
 If I was going to be in a book I wanted to stand out.
I did more to the centre of the bezel and chose a brighter, more colourful palette - hot pink Matsuno seeds, bright orange czech druk beads and size 15 matt lime centre bezel.
I made a test piece and hung it from a herringbone rope (on the right) and developed the section that was going to allow this design to spin.

I made a large delica/seed bead combination triangle (on the left) with an opening in the middle of the triangle.
I created a size 15 peyote "tube" from the back of the bezelled centrepiece which fitted through the opening in the triangle. making sure it sat neatly, firmly and still able to spin.
I then increased on the tube taking it out wide so it would not fit back through the triangle opening and would still allow the spin.
From there I created the combination Czech AB yellow gold netting with faceted green delica cross joints.
It looks yellowish but the sheen of green comes into play when you move in the light.
I am writing this as I received my copy of Marcia's book yesterday and I can tell you
I am thrilled to the max that little old me has created something that is printed in a REAL LIVE
book for the world to see, not just for now, but for years to come.
Much, much gratitude to you Marcia DeCoster for your continued support since we met in 2010
and for asking me to submit my design "Whirl"
Subscribe to:
Posts (Atom)